At the beginning of the project, my husband and I disagreed
on how to do the paintings. We watched several videos & steps. They started
as sketches on my ipad and morphed into the room.

The easy steps:
- Remove your
furniture. We gave the furniture to my parents. It’s a really nice sleigh bed.
It was the first step, and boy did the room feel huge again!


- Prime those
walls! Our walls were a light green beforehand, so we only needed one thick
layer of primer. Thanks to Mom for helping out there! We knocked that out in a
few hours one afternoon. While we were priming the walls, Alex primed these two
shelving structures from our original bedroom furniture. Those took an extra
coat.


- The next day was
Green & Blue Day. Alex drew the hills on the walls with a carpenter pencil.
Then we painted the top half blue & the bottom half green. Alex’s Mom
helped do the cutting. So we had two people work on it and it took may 4 hours?
The blue took two thick coats. The green took three healthy coats with
touchups. Meanwhile, Alex was painting the cubes, I mentioned earlier red
& yellow.


- I do want to note that this part is the start of where Alex & I disagreed. He said to outline the characters BEFORE doing the green & blue rather than going over. So ultimately, we both had good points. Here’s what you do for the characters (or at least what I’ve come to realize)
- Paint the whole room your background colors, you will have to cut in later, but it saves you from cutting in twice
- Draw outlines of your
characters. You can do this two ways. I can’t decide which was easier. Option 1
– sketch the outlines of your characters. You’ll need to be more careful when
you reprime the walls to retain your character sketches. Option 2 – put the
projector on the wall of the characters & draw a big blob & prime that
whole area. I did both ways, I can’t really tell you which worked better. The
truffula trees were easiest by Option 1, although we did those slightly
differently.


- Prime the area
you cut out (either just the character or the blob)

- Start with the
first character, turn on the projector and sketch the outlines of the
character. Because you are moving your projector around, this whole process is
the biggest pain. I didn’t get a single character to reline up. So your only
other alternative is to draw the character, then paint, without moving the
projector. I think this would take you much longer to do, especially character
required multiple coats and then you have to outline.

- I then moved to the next character and sketched him/her. Sometimes I did extra detail, even though I was going to paint over it. Why? I’m not sure, probably to feel slightly artistic (about tracing….). So you don’t have to do shading by any means, but anytime there is a color change, make sure you draw that line. Essentially, you’re making yourself a giant coloring book.
- Now the fun part. This part took hours and hours and hours. We used Acrylic paint, and the number of coats required was a pain.
- I ended up getting a different brand of orange which was more watery. That turned out okay, if I was doing more orange, I would not have used it.
- Grey – worked wonderfully, then again we had a big area to cover.
- Purple – wasn’t great, but we could only use a tiny brush so going over the details was a bit of a pain.
- Red – worked okay, but required more coats than I thought
- Light Blue – This went on great with only two coats
- Light Green – went on surprisingly well
- Dark Green – went on well
- Pink – went on well
- White – went on very well
- Dark Brown – I used a different brand, because we only needed a little bit, it wasn’t bad
- Light Brown – This was very watery and took quite a while
- “Flesh color” for Cindy Loo – I originally used the light brown, but she turned out splotchy & spray tanned…so I painted over white & used a flesh color, which worked fine.
- Darker Yellow – worked well
- Yellow – Yellow was a pain. I can’t stress that enough. I had to do a coat of the darker yellow on top of the white, to get the yellow to go on thicker. We did the Truffula trees on top of the blue & green paint. For the Yellow & Blue ones, it wasn’t a problem. This was a pain for the yellow. This was the biggest reason why we don’t have more Truffula trees…
- I found it
helpful to go over the colors in stages. So do all of the red for the room,
then another color, etc. If you need to see more progress, do one full picture.
Because this part takes the longest, whatever keeps you going is best. Also, if
you mess up a little bit, it’s not a problem (I found myself going, crab,
where’s the undo button several times), because you’re going to outline
everything in black.


- Once this dries, you can do a lot of
the outlining without the projector. For the outlining I used thick & thin
black sharpie oil-based paint pens. I went through 3 fat markers & 5 thin
markers. A lot of this was because of the cat & the hat. When you get to
the details, you’ll need to hook the projector back up to use as
references/guides. This was another painful portion. Mainly because I could not
ever get the picture to line back up again. The cat & the hat, was also a
pain. I didn’t even know where to start. So I put the projector up and did my
best. Some of the shading, I free handed, because again it was going to be a
pain. Yertle, was entirely free handed, because at this point I wasn’t going to
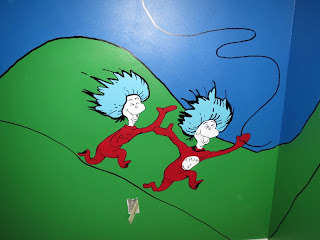
fiddle with the projector multiple times. Below are close-ups of each of the characters.


It is a very nice and informative post. Really thanks for this type of post.
ReplyDeleteStylish Patio Canopy