Showing posts with label 2 hours. Show all posts

Friday, July 20, 2012

Index Card Calendar

I can't remember if I saw this on Pinterest or actually on the block Peck Life, but I thought it was cute. I am under the assumption that I'll forgot about this in two months. However, I've been diligent so far! Ignore my index cards with holder box right now...the box I got was too small...

Where I got the Idea From: Peck Life

Time: 2 hours

Shopping List:
400 Index Cards (I'd say 377, but well you buy them in packs of 100)
Black Fine Point Pen
Index Card Box

Instructions:
1. Prep: So this project is really really easy, it's just tedious. So on the top of each lined card on the right hand side you'll want to put the date: Jan or January (I would stick with abreviations) then the day. You'll need 1 card for every day of the year (don't forget February 29th). 
2. Months: You need dividers for the months. I cut pieces of another index card out and taped it to the month for dividers. Peck Life, was much craftier than mine!
3. Years: So you'll use one line for each year. I keep a really good calendar at work, so I was able to go back 6 months and put what we did. Although a lot of days said "work". But it allowed us to not have to wait until January 2013 to start the project!
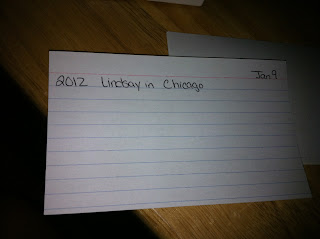
 4. Box: So don't get the small size Index Card box that's $1.88...get the $2.88 one. The smaller one doesn't fit...oops.
5. Keep up with it: I think this is the hardest part. But the sooner you do it, the more you're able to put about yoru day. I can't wait to get two-three years down the road and see how this forms. 

Alternatives: For holidays/birthdays that are on actual dates rather than floating holidays, I put the name of the holiday at the top of the card.

Tuesday, May 29, 2012

Custom Art Work

I think these will look great in the master bedroom (once I can actually get back in them again). These were super easy, and I think illustrate the plateau of my creative artsyness.

Where I got the Idea: Ready Made


Time: 2 hours

Shopping List:
Three tubes of paint
Three canvases
Masking Tape
Foam Brush


Instructions

1. Prep - To prep, I laid down a painters cloth outside (again utilizing that wonderful Georgia sun). This weekend had 50% off canvases PLUS an extra 10% off everything. So I got three canvases! I painted all three canvases an egg-shell white color (the same color we're going to painting the floor boards in the bedroom). I'm 99% sure you could keep them white, I just didn't. Then let it dry.


2. Tape - This was fine and a bit nerve wracking. I decided to make tape lines point toward the middle canvas then down the center of the middle canvas (if that makes sense). I ended up doing great lines (without realizing it), if I do say so myself.

3. Paint Again - So now paint again. I used the red that we're using elsewhere in the room. The green looked a little too Christmasy, so I painted over it in a dark green (almost black). I think that color was a bit too dark. Of note: If you have a dog that likes to help...they may end up with paint on their side. Fortunately, it wipes off easily. I would imagine if you've read any of my other posts, you can guess which one was the problem child....

 4. Remove Paint - Make sure you wait plenty of time for it to dry (hot Georgia sun helps). Then take off the masking tape. This was kind of fun. :) Voila! Ignore Gus's tail and Lucy's head...

UPDATE: I still cant wait to put this in the bedroom. I'm so happy with the lines. I didn't even plan it, which was even cooler. The green is a perfect dark green which should really pop against the light green walls and the red will match the newly painted furniture!

Thursday, May 24, 2012

Updated: Coffee Table

The ever changing coffee table!

Alex decided to redo the coffee table, because the first one had iffy varnish covering. He also decided to try a different pattern. I don't have a tutorial on this one, because I didn't do it. I did help pick the colors though! We had left over yellow & green. I told Alex that I didn't want yellow, green, & red. I knew he was going to go straight lines (he's a symmetrical balance sort of person). I thought our coffee table would end up looking like a flag. We didn't want that.

So what he sanded the table. Then he painted the entire table red. It's a Tuscan Rose, which is too pink for the furniture...so we have extra pink paint. Maybe I'll redo the bathroom...Anyway, he did two coats and let it dry. Then he put down painters tape leaving a little edge (because that was easier to paint). After the painters tape went the black paint. After that dried he put down 4 or 5 layers of polyurethane.

I think it looks nice. I wanted to do green wines on top of the red with yellow flowers. Alex said he was a man and would not have that in his living room (not really but he did tell me we were too young to have that design...so I'm going to be sneaky and figure out another way to get what I want!).

Anyway, the varnish cover was much cleaner this time and I think it turned out fantastic. I'm proud of his efforts on this!
In retrospect from the beginning just red...I think this turned out much nicer and much more fluid!


Monday, May 14, 2012

Toilet Paper Roll Art

I wanted to do this from the moment I saw it. Alex was a bit anxious about it, and I think he still is. Ultimately I think it came out pretty cool. I saw two designs for this - one that was a spiral and one that was a flowerly flowy one. I went with the latter.


Where I got the idea from: Cut Out and Keep

Time: 2 hours

Shopping List:
Krazy Glue
Bobby Pins
Clothes Pins
Lots of Toilet Paper Rolls, Paper Towel Rolls
Spray Paint (I used Georgia Clay)
Nails (and a hammer)


I used 8 or so Toilet Paper Rolls, 4 Paper Towel Rolls, and a used wrapping paper roll. The problem with the wrapping paper roll is that the flowers were smaller than the others. So if you are using this, I would make sure it is a larger roll (like Christmas paper). I ended up using the wrapping paper roll for smaller flowers & the leaves.

I started using rubber cement then switched to Krazy Glue. Use Krazy Glue...it dries much much faster!

My Final Note: I started using clothes pins. I didn't get the tight flowers I wanted, because clothes pins are thick. The Cut Out & Keep website suggested bobby pins. So I grabbed a pack of bobby pins and used them. They were much better, and enabled me to keep most of the flowers aligned. When I was gluing pedals together (rather than the individual flowers), I used clothes pins, because they were easier to grip & pull off. 

Instructions
1. Prep: To start, cut all of the rolls into thin strips. Maybe 1/2 an inch? This all depends on how thick you want it. They don't all have to be the same size (although you want them close). To cut them into strips, you can flatten the toilet paper roll (this gives the flowery look). Plus I'm not sure how you'd cut them easily if you didn't!

2. Making the Flowers: What you'll want to do is make several flowers (if you end up going with the spiral, only do one flower and then glue pieces spiraling out). To make a flower, take five toilet paper strips. Put a little bit of Krazy Glue near the edge of one roll and hold together another roll like so. Put a bobby pin on them to hold them in place. Continue on with the remaining petals.

3. Glue together: Glue together the flowers in a winding pattern. I used the smaller pedals as leaves pushing out. It's really up to you.

4. Spray Paint Once you are finished, Put your creation on a drop cloth & spray paint. You'll want to move around in a circle to be sure you get all edges. I did one thick coat which took about 30 minutes to dry (it was about to rain so I didn't have the benefit of that wonderful Georgia sunlight).

5. Hang: I suggest putting in two nails first then hanging your art. This will help ease the strain on the artwork as you are hanging it (it is after all painted cardboard paper...). You can manipulate it to give the curve/whatever you would like.

For being a really inexpensive project, I think it's definitely a high impact! Now back to that old wreath for my mother-in-law that I have to finish...


Monday, May 7, 2012

Painted Fan Blades


We saw the idea and decided to really go for it. We had decided on Tuscan Yellow for the fan blades, but it became "Deep Yellow." Again, we live in Georgia so the fan is always on. We were going for massive color so we decided to paint the entire fan rather than just chevron like the original website.
Where I got the idea from: Design Sponge

Time: 2 hours (unless you have issues screwing in the blades)

Shopping List:
2 colors of arcylic paint ($8)
Painters tape
Foam Brush
Ladder & Screw driver


Instructions

1. Prep: Unscrew the fan blades...this didn't take too long and did show some much needed dusting TLC. We washed the blades off quickly and dried them.
2. More Prep: Then we took off the attachments from the blade to the fan (what that is called escapes me). It wasn't too difficult as those screws were very large.
3. Paint Base: We painted the fans yellow, using a foam brush. This took two coats. Be sure to get the sides of the fan. If you have a spot or two, no one is going to notice (and we'll have to paint these back white anyway when we decide to sell). The blades kind of looked like duck feet!
4. Paint Accent: After that thoroughly dried (thank you Georgia sun!) we went for the red. This is the same red as the coffee table to help tie in all of the reds. I let Alex pick out the designs, since this was "his project." I was skeptical at how far apart he had his lines, but in the end they turned out okay.So for the red paint, we taped off the area we wanted to keep yellow, and thickly painted the red lines. We were running out of time/sunlight/red paint so we went for one thick application rather than two thinner applications. The only difficult part was the edges of the fan blade. I would paint those first, so the paint doesn't bulge up on the sides causing you to resmooth out the paint on the blades.

5. Reassembly: We let these dry and screwed on the white fan blade attachments
 
6. The Damn Screws: Screwing the fan blades back into the ceiling fan resulted in a few drinks...With one ladder, you need two people, but two people can't reach the fan. So this is what I finally did, which saved us from a Monday Morning Hangover. Take the fan blade, put the screw into the fan blade, and put the screw driver into the screw. Be sure you're holding the handle of the screw and not the top. Put all pieces together into the blade and screw into the holes. I am right handed and so I used my right hand to screw the blade in, and held my arm up bent kinda like a chicken to hold the fan blade in place so it would stop spinning. It may be easier to unscrew the bulbs first, but at this point it would have taken longer to do that!

Ultimately, the colors kind of look like we're big Harry Potter Gryffindor fans. But as I said earlier, the fan is always spinning, so now it just has some cool rings to it. It also ties in a lot of the colors!

Painting the Ottoman

We purchased an ottoman like this (but it came with 4 tiny collapsible mini ottoman seats) from Bed Bath & Beyond a few years ago to replace the giant glass one we had borrowed from my in-laws. We liked the glass, but it was heavy & huge. So to tie in the red, we painted the bottom of the table red (we figured if we didn't like it, we can always flip the ottoman & just have the cushion top!). 
Where I got the idea from: myself?

Time: 2 hours

Shopping List
Acrylic Paint - $3
Gloss Finish - $2
Paint Brush - $1


Instructions:

1. Initial note: The trick here is letting it dry. This was our first attempt with a finish. It didn't turn out great, but it was okay. 

2. Prep: Alex wiped down the ottoman (we have 4 animals...their fur is EVERYWHERE). He then taped off the sides. 

3. Paint: We used two coats of paint to get the color we wanted and let that dry (we set them outside in the sun, because it was super hot this weekend!). 

4. Gloss Finish: After that dried completely, he painted a coat of the finish. This was not done as neatly as possible (lesson learned). We have to make sure it's even. Alex did a second coat, but it still was a little splotchy. 

The centerpiece & remotes, mostly cover the splotchy parts. It's not bad for our first attempt with a finish, but it's probably my least favorite. All in all, it does help add color to the room, it just looks a bit DIY beginner. 
You can really side the sides on this one where the varnish didn't quite make it...