Friday, July 20, 2012

Index Card Calendar

I can't remember if I saw this on Pinterest or actually on the block Peck Life, but I thought it was cute. I am under the assumption that I'll forgot about this in two months. However, I've been diligent so far! Ignore my index cards with holder box right now...the box I got was too small...

Where I got the Idea From: Peck Life

Time: 2 hours

Shopping List:
400 Index Cards (I'd say 377, but well you buy them in packs of 100)
Black Fine Point Pen
Index Card Box

Instructions:
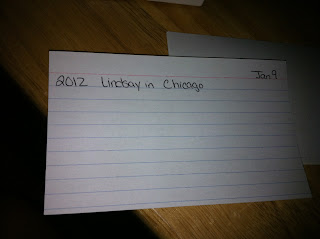
1. Prep: So this project is really really easy, it's just tedious. So on the top of each lined card on the right hand side you'll want to put the date: Jan or January (I would stick with abreviations) then the day. You'll need 1 card for every day of the year (don't forget February 29th). 
2. Months: You need dividers for the months. I cut pieces of another index card out and taped it to the month for dividers. Peck Life, was much craftier than mine!
3. Years: So you'll use one line for each year. I keep a really good calendar at work, so I was able to go back 6 months and put what we did. Although a lot of days said "work". But it allowed us to not have to wait until January 2013 to start the project!
 4. Box: So don't get the small size Index Card box that's $1.88...get the $2.88 one. The smaller one doesn't fit...oops.
5. Keep up with it: I think this is the hardest part. But the sooner you do it, the more you're able to put about yoru day. I can't wait to get two-three years down the road and see how this forms. 

Alternatives: For holidays/birthdays that are on actual dates rather than floating holidays, I put the name of the holiday at the top of the card.

Woven Wine/Beer Journal

It's been a while. I've been a slacker. I did want to share a project I did (which I think will soon be replaced by an awesome App I found unfortunately). So let me say this...1) If you want to cover a regular sized composition notebook, you need to use prints larger than 8x10. The smaller composition book I used was really not adequate. This is by far not the best work I've ever done, but it's cute.

Where I got the Idea: Ruby Murrays Musings

Time: 2 hours

Shopping List:
Small Composition Notebook
Double-sided Tape
Clear Scotch Tape
5 or 6 pages from a Beer & Wine magazine
Something heavy to hold down the magazines with
Scissors
Instructions:
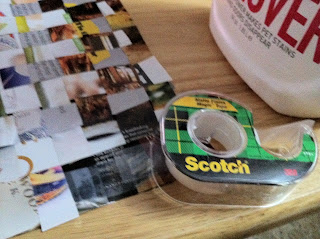
1. Prep - To begin, you'll need to cut the pages of the magazine into strips. If you were smart (unlike me), you'd actually measure. I was doing this to reduce stress, so I just cut. As you can see, my lines are not uh even.


2. Tape - You'll need to cover the front of the composition book with double-sided tape.     


3. Weave - Layout all of the horizontal pieces, I used two(ish) magazine pages. One of a bottle of wine and one of a bottle of Whiskey. I inter-spliced this (one part of the wine bottle, then a strip from the whiskey bottle, then part of the wine bottle, etc.), because I thought it would look kinda cool. In retrospect, I think I suggest doing one then the other.


4. Weave - So then you take one of the remaining strips and weave it through the horizontal row. It's helpful to put something heavy on the corner to weight down while you are weaving. 


5. Assembly - I put my woven picture on top of the book and flattened starting at the binding. I then cut the edges to match the edge of the composition book.
 6. Tape - I think the original person used contact paper, which I'm sure looks nicer. I just had scotch tape, so I taped the cover down for protection.
7. Wine/Beer - So I used one side of the book for wine and one for beer. The wine has been just Robert Mondavi, which hasn't been bad! The beer we've had all kinds of varieties of Clown Shoes, Terrapin, more Terrapin, Lagunitis, and more. 

While I like my journal, we then found an awesome app for the ipad called My Beer Nation. It's pretty awesome....we've been using that. I plan on trying to make the woven atlas journal for my grandparents for their travel to Egypt. I think it'd look pretty cool! :)

Thursday, June 28, 2012

Hornets

So apparently this sucker had been growing on the side of the house for about 6 weeks. Our trusty kudzu.com rated pest removal guy came out yesterday to assess it. He said he's bee in the business for decades, so little surprises him. This surprised him! Good gravy this surprised him! He said there are between 2,500 - 3,000 hornets in this nest!!!


Well worth the couple hundred to take it down!!!! It's being removed today, but wow! Yuck!

Finished Room

Good Grief Charlie Brown!

It's been a busy few weeks with work/life, so this took a back seat. Seems just as easy to provide one update and start anew!


The wonderful floors! So we realized the stain was not even (the downside of two people doing the room...one had a heavier hand than the other). Since we were already 3 weeks into sleeping in the living room, we decided "screw it" let's do another coat!

First, we put molding around the floors. I initially painted the molding white to match the baseboards. That didn't quite work as planned...so we decided to just stain the molding the same color as the floors. Then we stained & varnished again.


In the mean time, we began painting our furniture to a Cabernet color. It was a little too pink at first, but turned into a very nice shade of red that really pops with the room. We still have a few more pieces to paint.

These were pretty easy - prep - prime - paint.

So the 3rd piece that isn't painted is a dresser that goes underneath the paintings. I have to hem the curtains, because they hang on the floor. But all in all, I think the room looks great!

These are the curtains. that other piece goes against the wall on the left side.


The artwork looks great! I can't wait to try more! We have a dresser that goes against this wall now too. We just haven't painted it yet..oops :)

Here's when you first walk in....as you can see Lucy was all about being in some pictures!!
And here's the view to the closet, where you can see the red dresser...and Lucy posing...again.

Thursday, May 31, 2012

Memory Prisms

My mother knows an artist who does these prisms. When my great grandmother passed away in December, my mother had these made. We gave the artist a few trinkets that reminded us of her and she made these prisms. I think they're great! We gave one to my granddad for his birthday and he really liked them as well!

Mine had a card (we liked to play cards), an amber earning (we went to the Museum of Natural History in NYC one year when they had an amber exhibit), a purple bracelet (her favorite color), a dolphin (we went to Sea World one summer), and a few other little pieces. The artist is local to Georgia, but the prisms are awesome!!! She has different sizes. This one is about 3" on each side.